 ⭐ Featured
Pav Bhaji
Mumbai's beloved mashed vegetable curry served on butter-toasted soft buns — street food gold.
Mashed taro shaped into patties and pan-fried — the everyday snack of Arunachali plains communities
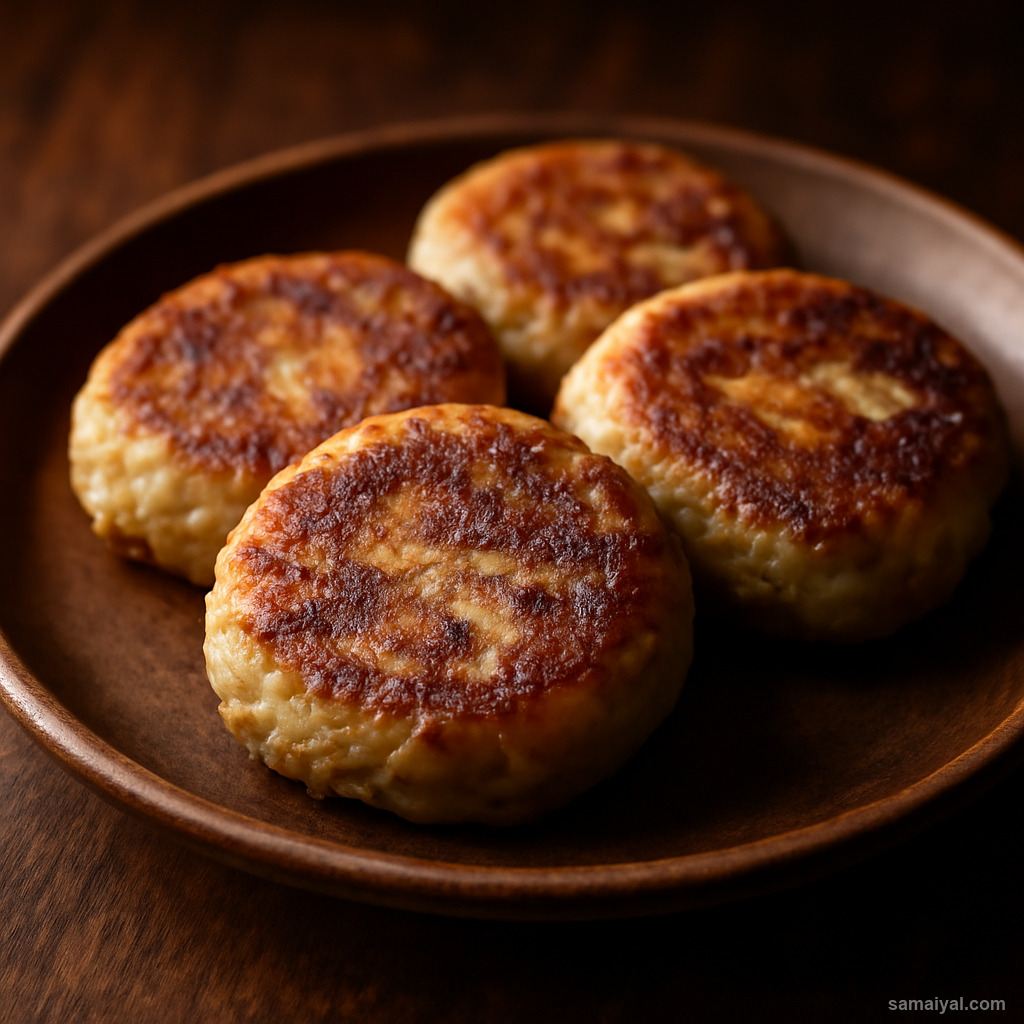
About Taro Fried Cakes Arunachal: Taro cakes are the quick energy snack made when taro is abundant in Arunachali home gardens. Taro (called arbi in Hindi, kosu in Assamese) thrives in the wet tropical lowlands of Arunachal Pradesh and is a staple starch alongside rice. The cakes are simple but satisfying — pan-fried patties with crispy edges and soft creamy interiors, beloved across the Brahmaputra valley as both snack and side dish. The dish reflects the practical genius of Arunachali home cooking: take an abundant garden vegetable, season simply, fry quickly, eat warm.
Understand colocasia: Colocasia (taro root, arbi in Hindi, kosu in Assamese) is a tropical tuber with rough brown skin and starchy white flesh inside. Available at Indian groceries, particularly those with Bengali, South Indian, or Northeast Indian sections.
The critical safety warning: Raw colocasia contains calcium oxalate crystals that cause severe itching of skin and mouth. Always handle with gloves when peeling, and never taste raw. Cooking destroys these compounds completely; properly cooked taro is safe.
Prepare with gloves: Wear disposable kitchen gloves throughout the peeling. The crystals can cause hours of skin itching even after washing.
Wash and boil: Use 500g of taro. Wash the whole tubers thoroughly under cold running water — they often have soil clinging to the skin.
The critical first boil: Place the whole unpeeled taro in a saucepan. Cover with plenty of cold water. Add 1 tsp salt. Bring to a rolling boil over high heat.
Boil for 25-30 minutes: Once boiling, cook for 25-30 minutes. The boiling water and salt extract the calcium oxalate compounds and cook the taro through completely. The water will become slightly cloudy — this is normal and contains the dissolved oxalates.
The doneness test: Pierce one with a fork — it should slide through with no resistance. If the centre is still firm, cook 5 more minutes.
Drain and discard cooking water: Drain the taro through a colander. Important — discard the cooking water. Do not save it; it carries the dissolved compounds.
Let the taro cool slightly: Let cool for 5 minutes — easier to handle without burning your fingers.
Peel the taro: Once cool enough to handle, peel off all the rough brown skin. The skin should slip off easily after boiling. Discard the skins.
The critical mash: Place the peeled taro in a wide bowl. Mash thoroughly with a fork or potato masher while still warm — warm taro mashes more easily than cold. The mash should be smooth but with some texture remaining. Avoid pureeing — that produces gluey patties.
The critical moisture removal: This step is essential. If the mash looks wet, transfer to a clean kitchen towel and squeeze gently to remove excess moisture. Wet mash produces patties that fall apart in the pan.
The dryness check: Take a small portion of mash and squeeze in your fist. It should hold together as a dense ball with no water dripping out. If wet, squeeze more.
Prepare the green chilli: Take 1 fresh green chilli. Finely chop. Adjust quantity to your heat tolerance.
Prepare the spring onions: Take 2 spring onions (scallions). Wash and slice into thin rounds.
Mix the patty mixture: To the mashed taro add the chopped green chilli, sliced spring onions, 1/2 tsp turmeric powder, and salt to taste — about 3/4 tsp. Mix thoroughly with your hands or a spoon for 1 minute, ensuring everything is evenly distributed.
The consistency test: Take a small portion of the mixture and try forming it into a patty in your palm. It should hold together when shaped without falling apart. If it crumbles, you may need to mash slightly more — the natural starch will bind it.
Shape the patties: Take portions of the mixture (about 3 tablespoons each) and shape into flat round patties about 6cm wide and 1.5cm thick. You should get 8-10 patties from this quantity. The patties should look uniform — uneven sizes mean uneven cooking.
Let the shaped patties rest: Place the shaped patties on a plate. Let rest for 10 minutes. The brief rest helps the patties firm up and hold their shape during frying.
Use a wide flat pan: Use a wide flat heavy pan or non-stick frying pan. Cast iron is excellent for these patties.
Heat the oil: Pour neutral cooking oil into the pan to a depth of about 5mm — just enough for shallow frying. Place over medium heat. Heat for 1 minute until shimmering.
Test the oil temperature: Drop a tiny piece of mash into the oil. It should sizzle immediately and start cooking. If the oil is too cool, the patties will absorb oil and become soggy. If too hot, they brown before the inside heats through.
The critical first fry: Carefully place 4-5 patties at a time in the hot oil — do not crowd. Let cook undisturbed for 3 minutes. The bottom should turn deep golden brown with crispy edges.
Flip carefully: Use a flat spatula to flip each patty. Cook the second side for another 3 minutes, until equally golden brown and crispy.
Why not move them: Moving the patties before the bottom has set causes them to break apart. Patience produces beautiful intact patties.
Drain on paper: Lift the cooked patties out with a spatula. Drain on kitchen paper for 30 seconds.
Keep warm: Keep finished patties warm on a plate covered with a kitchen towel as you cook the next batch.
Check for safety: Bite into a patty. There should be no scratchy or itching sensation in your mouth — that would indicate undercooked oxalates. Properly cooked taro is completely safe and slightly sweet-earthy in flavour.
Serve immediately: Taro cakes are at their peak within 15 minutes of cooking, while still warm and the edges are at peak crispness.
Serve with chilli paste: The traditional Arunachali pairing is with garlic chilli paste (recipe id 1123). The bright, spicy paste complements the mild creamy taro beautifully.
Serve with tomato chutney: For a milder option, serve with tangy tomato chutney (recipe id 1149).
Serve as a snack: Eat with hot tea as an afternoon snack. The combination of crispy-creamy patties and hot tea is genuinely satisfying.
Serve as a side dish: At meals, pair with rice and a meat curry — the patties provide bite-size starch alongside more substantial dishes.
For children: Children love these patties. The mild flavour and crispy-creamy texture is appealing, and the home-made nature is more nutritious than commercial snacks.
Variations: Some Arunachali families add 2 tbsp grated coconut to the mixture for sweetness. Others add 1 tbsp chopped fresh coriander. Both work well.
For breakfast: These patties make excellent breakfast paired with a fried egg and chutney. The combination provides sustained energy for the morning.
A nutritional note: Taro is exceptionally rich in fibre, vitamin E, manganese, and potassium. It also has a lower glycemic index than other starchy vegetables, making it suitable for those managing blood sugar. The Arunachali tradition of frequent taro consumption has nutritional wisdom built into it.
A cultural note: Taro cultivation has been part of Northeast Indian agriculture for thousands of years. The plant grows easily in wet tropical conditions, requires minimal care, and provides reliable starch even in poor soils. Eating these patties is participating in a long tradition of garden-to-table cooking.
Leftover storage: Cooked patties keep at room temperature for 6-8 hours. Refresh by warming briefly in a hot dry pan for 1-2 minutes per side to restore crispness. Stored in the fridge, they keep for 1 day but the texture changes — better to make fresh.
⭐ Featured
Mumbai's beloved mashed vegetable curry served on butter-toasted soft buns — street food gold.

Fluffy steamed chickpea flour cake from Gujarat — light, spongy, tangy and totally addictive.

Mumbai's vegetarian burger — spiced potato dumpling in a fried batter, served in a...
 ⭐ Featured
Crispy golden pastry filled with spiced potatoes and peas — India's most loved snack,...
Comments & Tips
Be the first to share your experience with this recipe!
Leave a Comment